|
Home
Instructors
Schedule
Grading
Readings
|
Introduction to Land Measurement: Assignment
Guidelines:
- Be careful and methodical.
- Show your work where applicable (as an appendix to the
report).
Methodology:
Field procedure
- Form teams of three. At least one person on each team should
have taken ESRM 250 or have experience using ArcGIS.
- Make sure each team has a compass, clinometer, measuring tape,
and field notebook.
- Do not adjust your compass for magnetic declination; we will
correct for that in the calculations. Record your angles as
azimuth values (0°-360°).
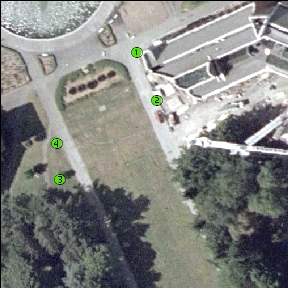
- Traverse the 4 lamp post stations as indicated in the photo
below.

- Station 1 is an interpretive sign titled "Shaping the UW
History"
- Station 2 is a lamp post marked "K3" in black letters
- Station 3 is a lamp post marked "BG-27" near the base
- Station 4 is a lamp post marked "BG-26" near the
base.
- The distance measurements should be taken from pole to pole.
- You may need to step away from the stations in order to avoid
magnetic effects.
- Elevation angles should be measured using your partner's head
as a target.
Deliverable
Turn in a single PDF file, via Catalyst Collect It. It should
be identified with all team members' names, the course number,
quarter, and date.
It should contain the following
sections:
- Scanned original field notes
- A hand-drawn graph of the area
- Error of closure (EOC) and precision reported as a ratio
(1:xxx)
- The coordinates of each one of the four points in WA-State
Plane North, NAD83 Feet
Note: assume the State Plane
coordinates for Station 1 are (1277179.9, 241854.7).
- The area in acres described by the four points
- Two (simple) maps produced with ArcMap showing an orthophoto
of the area of campus traversed in the survey, including:
- Map 1:
- Team member names and date of survey
- Stations labeled with ID, X-coordinate, Y-coordinate,
and measured interior angle
- Polygon edges labeled with measured lengths
- A label at the polygon center displaying calculated area
- Scale bar and north arrow
- Map 2:
- Team member names and date of survey
- Stations labeled with ID and corrected interior angles
- Polygon edges labeled with lengths obtained from the GIS
- A label at the polygon center displaying area obtained
from the GIS
- Scale bar and north arrow
- An appendix (optional) showing your calculations
Helpful notes for ArcGIS are here.
|
